Making Repo Travis-CI and Coveralls Compliant
Contributed by Rich
This document will walk through the steps involved in activating Travis-CI for continuous, automated testing, along with Coveralls for reporting code coverage of tests.
Background and automated testing
Travis-CI initial setup
Travis-CI script configuration
Travis-CI test results
Coveralls initial setup
Coveralls configuration
Background and automated testing
Using Github gives us numerous tools to help with automatic unit testing of open source projects. Travis-CI automatically downloads and tests your repo, returning whether or not all tests pass. If you tests output a .coverage file (see Coveralls configuration below), that can be automatically passed to Coveralls where the amount of code tested can be reported in your repo.
These tools are intended to help developers build better code. On each pull request, it becomes easy to see if tests fail or pass, adding to the safety of merging in changes. They also give us a handy benchmark of how deeply tested our code is.
This document will walk through the steps involved in setting up a Github repository to do automated testing and test coverage using Travis-CI and Coveralls. This is to help make sure all unfoldingWord-dev repos, or at least more specifically tX repos, have a common setup and dependencies.
Note that going through the initial setup steps requires having administrative privileges on a repository.
Travis-CI initial setup
Most of the below is covered in Travis-CI’s “Getting Started” guide.
- Go to https://travis-ci.org and sign in through your Github account. Github will ask you for permission to share your information with them, including organization membership. This is totally safe - it lets Travis-CI see what repos you can activate.
- Click the [+] button on the left next to the “My Repositories” header. This will bring up a list of all repositories that you can activate.
- Activate that repo by clicking the gray toggle-slider button. That’s it! You can modify settings on particular repos by clicking the gear button next to the activation toggle. By default, a Travis-CI job is run on every pull request and every commit.
- Add a build badge to the top of the README.md file in the root of your repo. Clicking on the repository under the “My Repository” heading will take you to a build status page. In the header of this page is a little badge, as pointed to in the image below.
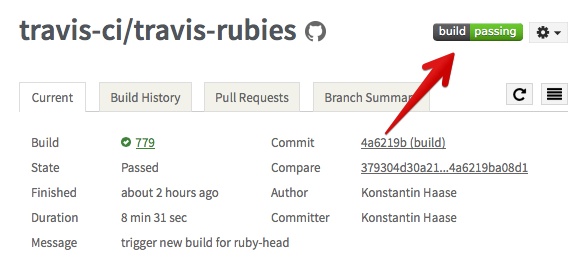
Click on that image to get a popup with several options for the link style (in the pulldown menu on the left). Select Markdown, then you can copy and paste that link into your README.md file.
Travis-CI script configuration
Triggering the automated tests requires a little configuration in your repo. This means creating, in the root of your repo, a YAML-formatted file called .travis.yml. Travis-CI has some very detailed documentation available on how to create these.
The remainder of this section will include examples in a few of the more prominent languages we use. At the very least, you need a language: line with the project language in all lower case. Follow that with the language itself as a line, and the versions of your language you want to test on proceeding lines.
For example:
language:
  - python
python:
  - '2.7'
  - "3.5"
Finally, the script: command is the command to run to perform the tests, and its output is used to judge whether tests pass. This can be any valid command, though make test might be the most common. Tests are judged to have passed only if the script finishes with exit code 0.
For Python, see an example in the Travis-CI docs)
# command to run tests
script: nosetests
or
script: make test
or
script: python test.py
What we put in the ‘script:’ area will change when we also hook up Coveralls to the test, but the above are examples when not using Coveralls, to be able to use the Travis-CI test results section below.
There are also the before_install:, before_script:, and after_success:/after_failure: commands. These are pretty self-explanatory: they run the connected line at that condition. But more details on how to deeply configure your .travis.yml file are available in the Travis-CI documentation.
Travis-CI test results
When your tests pass, all is well, and you’ll see the [build|passing] badge showing up happily in your README.md. If tests fails, though, that’ll be replaced with a [build|failed] badge in red. Clicking that badge (pass or fail) will take you to the Travis-CI status page for that repo.
There are a lot of options here. Under the “Current” tab, the main panel will show the most recent commit message, and whether it passed. Below that are rows for each build job (one for each language version you included in your .travis.yml). Clicking on those will open up a view of the console where that job was run, including any STDOUT and STDERR results from running the build and test scripts.
These should help you diagnose what went wrong.
Coveralls initial setup
Setting up Coveralls to run against your repo is not very different from setting up Travis-CI, which should be set up first.
- Login to https://coveralls.io using your Github account. This will pause for a moment while it looks up which repos you have administrative access to.
- Click the “Repos” button on the top of the left side menu.
- Click the “Add Repo” button on the upper right (if present, this might just drop you in to a list of available repos on your first time)
- Select a repo to activate, and click the toggle switch.
- Clicking on the ‘Details’ button that appears after the switch is flipped on will take you - for now - to a page with a little help on configuring your repo to be built against Coveralls, especially with Ruby and Travis-CI pro. You probably don’t need this for now.
- On the top of that page is a banner that includes a similar badge to Travis-CI. Click the “Badge URLs” button and copy the Markdown block to paste in your README.md at the top next to the Travis-CI badge.
Coveralls configuration
There are two phases here - setting up Coveralls to be run at all, and configuring your tests to work with Coveralls. The first is trivial. Add the following line to your .travis.yaml file:
after_success: coveralls
Much like it says, if the tests are successful, then the coveralls option gets run. This is built in to Travis-CI - there’s nothing else you’ll need to do for it to start.
The configuration step can be much trickier. The short version is that your test results must create a file called .coverage in the root of your repo directory. The coveralls command sends that file to the Coveralls server for processing.
Fortunately, the Coveralls documentation includes instructions and examples for working with most modern languages.